Lynette, from All of Me, is very happy - spring, purchases, beads she's made (ooo! they're lovely), wants to know what has made me happy this week?
Some glass shelves we bought on Sunday at a very discounted price, means I can get my bead candy out of the drawers and on display (please, this weekend for getting them up).
Selling a cot quilt at Rose City Quilters Celebration of Quilts Show, that some member of my family (who shall remain nameless) said had design flaws - someone else liked it enough to buy it :-)
Almost finishing another cot quilt - an order.
Starting to sort out the sewing room - after 5 weeks of creating 30 art quilts, it looks like a dog's breakfast!
Life is on a more even keel. Hurray!
I am grateful for so many things - especially family and friends.
Thank you all.
Tuesday, August 31, 2010
Another Quilt Finished - Feathers & Fans
I decided to get the quilting on this one finished, even though it's not needed until next year, so that it could be on display at the recent Rose City Quilter's Celebration of Quilts Show. It started from off-cuts from my friend, Pam's quilt, I added the cream and then she gave all the leftover pieces. Nothing was left. It is not really my colours, but I kind of like it and it is for a significant birthday next year. I hope the person really likes it.
I loved doing the quilting. I don't normally do machine quilting with stopping and starting, but I think that the blocks called for something individual.
 It's called Feathers and Fans and measures 54.5" x 60.5" (138.5cm x 154cm).
I loved doing the quilting. I don't normally do machine quilting with stopping and starting, but I think that the blocks called for something individual.

Monday, August 30, 2010
Sometimes It's Just Easier ...
.. to make up a simple pattern for a quilt. Here's one (of two the same) I have made in the past month while creating the 30 art quilt pieces:
 I had the blue box of fabric out and went through it to use up the smaller pieces. It didn't make much of a dent in the stash, so I will have to make more. All I bought was the batting, a low-loft polyester. It measures 39" x 40.5" (980mm x 1250mm), so an ideal size for a cot/child's lap quilt.

Thursday, August 26, 2010
The Last of the Exhibition Quilts


 | |
| the pieces on the left are a double-up from the top (right) |
Enjoy!
P.S. I'm sorry that the lighting is not very good in these photos - using the flash with the little camera was pointless, because of the distance I had to stand to get them in the shot.
Wednesday, August 25, 2010
Textures
My talented friend, Rhonda, juggles so much in her life and yet, constantly churns out amazing work. She has 2 little girls (aged 8 and 6) and she encourages them with their art/craft work as well - sometimes I wonder who is having the most amount of fun - never mind, it's lovely to see and even more exciting to see their collective work.
These pieces are Rhonda's work with texture. I hope you can see the photo well enough, otherwise you will have to leave a comment and I'll get some closer photos to post.
Enjoy!

These pieces are Rhonda's work with texture. I hope you can see the photo well enough, otherwise you will have to leave a comment and I'll get some closer photos to post.
Enjoy!

Tuesday, August 24, 2010
Wearing Her Heart on Her Sleeve
My friend Cheryl's pieces are themed as such. She has made her pieces from Op Shop jerseys and cardigans. They are pretty, sad and innovative:

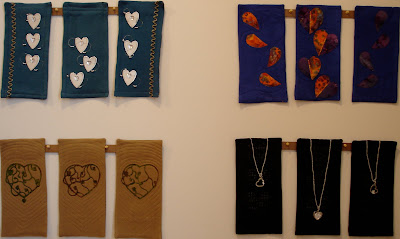 Because they are displayed in 2 rows across the wall, it was difficult, with my little point and shoot camera, to get them in one shot. Hope you can see the work she has done.


Monday, August 23, 2010
Another Selection of Pieces from Exhibition

Sunday, August 22, 2010
Other Pieces from the Exhibition
As you come into the gallery and walk along the 'aisle', this is the work you see on the end wall. It is Sue's 30 pieces:
 It is the perfect place for it because it needs an area big enough to see it from afar. This is from a photo of a barn roof (from inside looking up). I was able to help Sue in printing this out from a single photo. Using Photoshop Elements, I divided the photo into 30 pieces and we then printed it directly onto cotton. Sue treated each piece as a 'quilt', i.e. sandwiching it with batting and a backing and stitching details as needed.
I think it looks fantastic!
Click on the photo to have a closer look.

I think it looks fantastic!
Click on the photo to have a closer look.
Saturday, August 21, 2010
Tenth and Final Set of Pieces for Exhibition
Another feature of Alice's trip in Wonderland was the caterpillar.
 So here we have the Monarch butterfly collection:
 The caterpillar had me thinking for a while as to how I could make him. I even went to an electrical shop to ask about a small vent thing - you know like they have for clothes dryers. But I was lucky when I went to the $2 shop and found a pack of small slinky's - perfect! I then bought a T-shirt with narrow black and white stripes, cut off the sleeve and 'painted' on the yellow stripe! Glued one half of the slinky on to the fabric and stitched him up! The antennae are painted stamens.

 And, finally we have the butterfly. This is a macro shot of the wing - painted, then heavily quilted:
There we have it - all my entries for the exhibition. I have really enjoyed playing with different techniques. The challenge of the size helped focus and certainly when I'm out walking I'm looking at things in a different way. I have a couple more ideas that I'm working on, so if none of these sell I will be adding to them.
Hope you have enjoyed the variety!
I will post some photos of the others pieces of work over the next few days.


Here is a close-up:
The pupa (looks strange, I know) is silk paper, a new technique for me, formed around a felt 'bug'.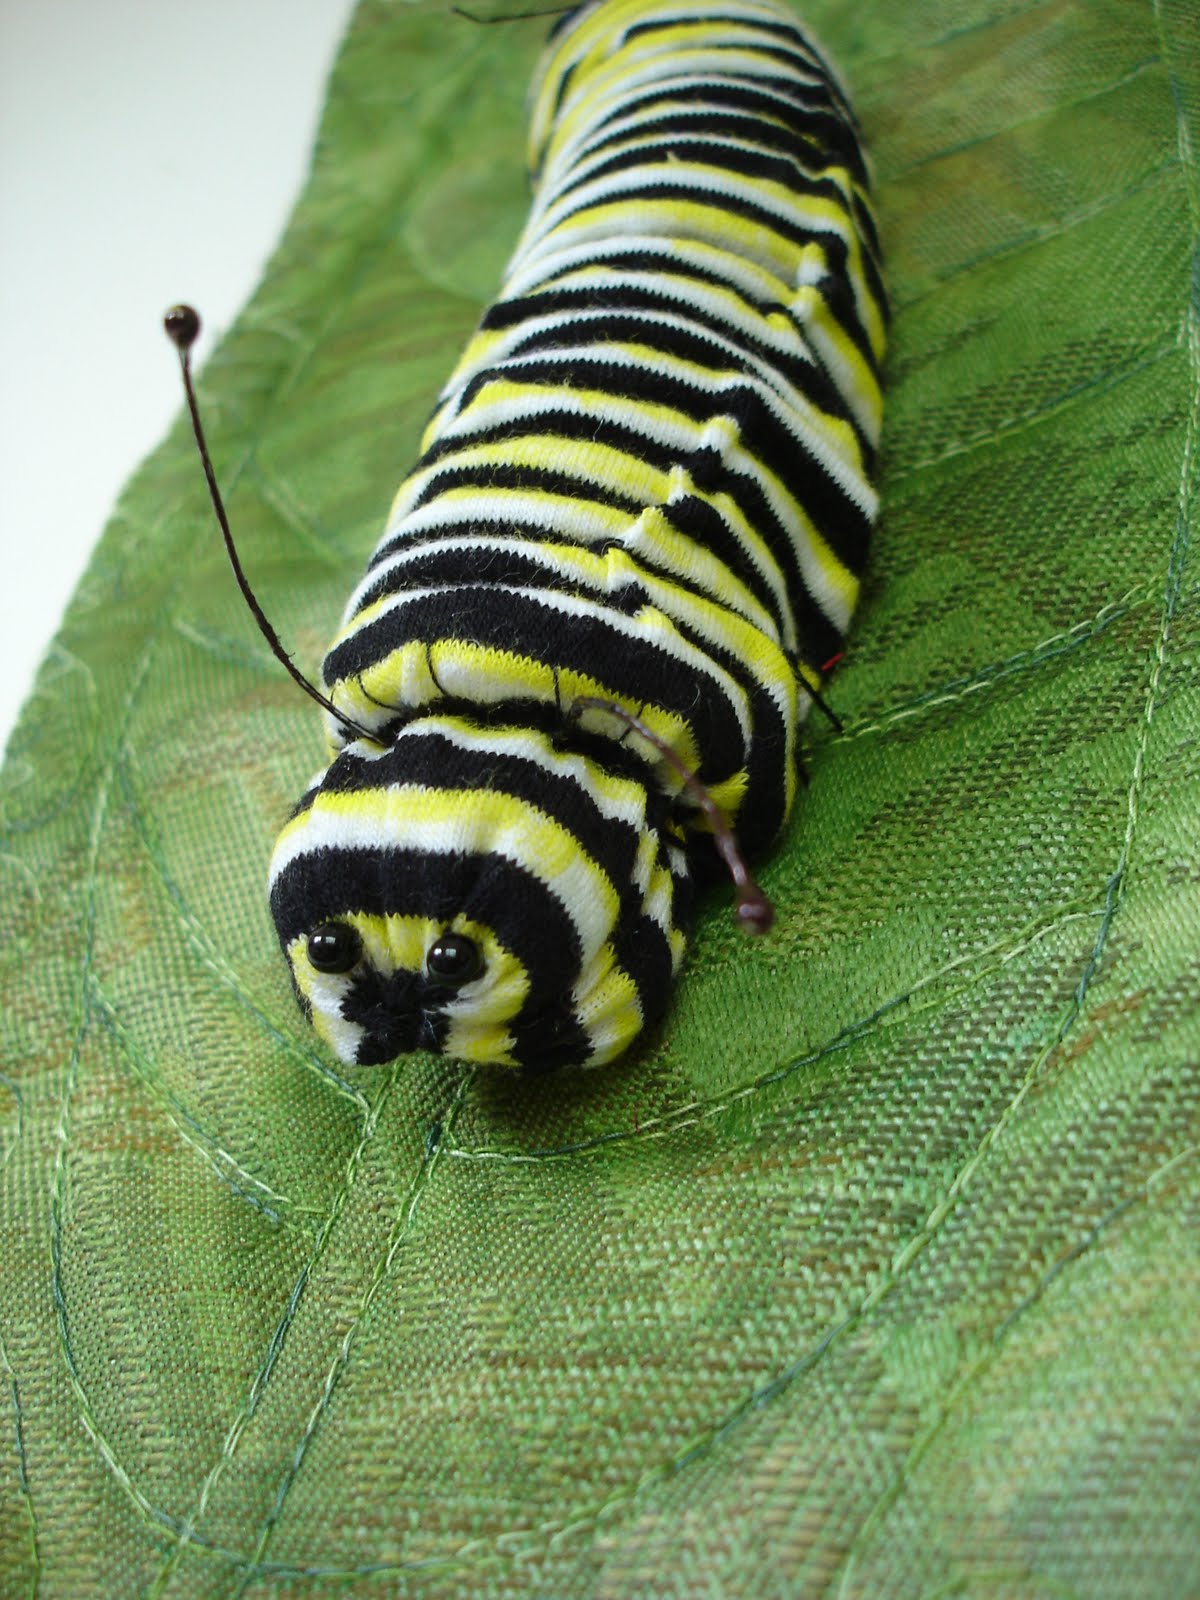


There we have it - all my entries for the exhibition. I have really enjoyed playing with different techniques. The challenge of the size helped focus and certainly when I'm out walking I'm looking at things in a different way. I have a couple more ideas that I'm working on, so if none of these sell I will be adding to them.
Hope you have enjoyed the variety!
I will post some photos of the others pieces of work over the next few days.
Friday, August 20, 2010
Nineth Set of Pieces for Exhibition
It wouldn't be Alice's Wonderland without a toadstool, and although I don't have the Fly Agaric growing in my garden, I couldn't resist doing something along those lines.
 So, here we have it's cap: I used Pebeo Setacolor paint and tried to use some circles as a resist, but the sunlight wasn't strong enough. Anyway, out with the gesso after quilting, to add some texture.
 Next are the gills: I had never made chenille before so here we are. The stitching lines probably need to be closer but I used my new Bosch cordless rotary cutter to cut the fabric and wanted to make sure there was enough gap to place the cutter.

Now we have a partial view of the complete toadstool, plus 'skirt':
All three pieces together =


 Next are the gills: I had never made chenille before so here we are. The stitching lines probably need to be closer but I used my new Bosch cordless rotary cutter to cut the fabric and wanted to make sure there was enough gap to place the cutter.
Now we have a partial view of the complete toadstool, plus 'skirt':
All three pieces together =

Thursday, August 19, 2010
Eighth Set of Pieces for Exhibition
We have a small grove of kowhai trees just out from our bedroom. They are close to coming into flower, then we will have tuis drinking of the nectar. I have done a set of kowhai which covers the 3 cycles.
 First the leaf. When you look at the macro shot of a leaf there is a myriad of veins. I have used the flour resist fabric from an earlier post, then painted the leaves on and stitched each leaf fairly heavily.
 Next is the flower. I have used actual leaves and then collaged the fabric of the flower. This technique used here is encaustic - encased in beeswax. I 'painted' melted beeswax over the leaves and fabric, then used a warm iron and baking paper to ease out the lumps of wax.
It smells beautiful!
 Lastly are the seed pods. These droop for quite a few months and the seeds are like small yellow peas. I have used actual pods here but firstly they were encased in Mod Podge which makes them more flexible. They are then stitched on and I have made seeds from embroidered French knots.
Final view:
 I think this might be my favourite set.


It smells beautiful!

Final view:

Wednesday, August 18, 2010
Seventh Set of Pieces for Exhibition

 This trio is the New Zealand Fantail, Piwakawaka. It is such a joy to have the fantails around - they are so cheeky, flitting around when you are working outside, so I could not do something with this little bird.
The first piece has a background of used tea bags. The close up of the eye has been drawn with ink pencils then thread stitched.


Tonight, I am helping to set up the pieces at the Gallery.
Tuesday, August 17, 2010
Sixth Set of Pieces for Exhibition
We are over half-way now and only a few more days until the exhibition opens - how exciting is that?
 This odd-looking set is Tree Bark.
From left I have made Liquid amber bark from felted wool. I had to hand-stitch the 'lines', then needle-felted extra wool for 'texture' and lichen.
The center one is more like the Poplar trees and is made from brown paper, stitched on the machine with cords twisted from wool, knitting yarn and whatever else took my fancy.
The third piece is the Silver Birch tree. This is made from an appropriate batik cotton stitched with velour thread over shrink fabric. After it had all shrunk, I then stitched horizontal lines as you see on the trees.
Weird looking, I know, but fun to try!
Monday, August 16, 2010
Fifth Set of Pieces for Exhibition
After the group finished making the collaborative art journals, we pondered on what to do next. The biggest problem was having no deadlines, well lax ones anyway, and being motivated. We decided to each choose a theme and work on something. But, best laid plans and all, not all of us did much about it - citing every excuse under the sun! I am REALLY talking about myself here!
The first theme was seasons, so I at least started with an idea, but it didn't really fire me up. The 3 pieces I started, languished in the wardrobe, waiting for the 4th. But, I'm not one to waste a good start, so have used 3 pieces here for the exhibition. Now, there is no perspective involved, it's just an emotion (?) and a play!
Here we have Spring, Summer and Autumn.
 Each of the tree trunks represents the silver birch tree. I stitched across the shape with Lana thread then painted across it with Textile Ink. I think that if I hadn't used such a 'furry' thread the paint may not have stuck to it so much, therefore giving me the 'look' I was after - but never mind, these pieces are mostly experimental.
Spring:
 The batik background is cool-ish, because spring is such changeable weather. I have made 'catkins' (yes I know they look big) from polystyrene 'worms', covered in un-spun wool and wrapped with embroidery thread. There are 'seed' stitches on the ground, because if you were a little Alice, you would see the seeds, and there are a few lutradur leaves on the tree.
 a hot batik for this background, leaves made from lutradur (cut with a soldering iron and stitched on), and a few leaves made from painted Vliesofix (I don't really like that effect, though).
Autumn:
 I have used a heavier weight of lutradur here, painted, cut out with the soldering iron, plus some 'burning' on the top. I then used some metallic paint as highlights. There are also some leaves made from organza - this is done with Washaway sandwiched between 2 pieces of organza, stitched, washed and trimmed. I love the effect and I think I will have to make some more soon.
The first theme was seasons, so I at least started with an idea, but it didn't really fire me up. The 3 pieces I started, languished in the wardrobe, waiting for the 4th. But, I'm not one to waste a good start, so have used 3 pieces here for the exhibition. Now, there is no perspective involved, it's just an emotion (?) and a play!
Here we have Spring, Summer and Autumn.

Spring:

Summer:
 a hot batik for this background, leaves made from lutradur (cut with a soldering iron and stitched on), and a few leaves made from painted Vliesofix (I don't really like that effect, though).
Autumn:
 I have used a heavier weight of lutradur here, painted, cut out with the soldering iron, plus some 'burning' on the top. I then used some metallic paint as highlights. There are also some leaves made from organza - this is done with Washaway sandwiched between 2 pieces of organza, stitched, washed and trimmed. I love the effect and I think I will have to make some more soon.
Sunday, August 15, 2010
Fourth Set of Pieces for Exhibition
Something a little different - I really love my hens, so had to have some pictures of them included. This idea I saw in a book on digital imagery for fabric and although it was used in a landscape situation, I thought it would be fun to try.
Here we have the Blue Andalusian rooster (Blue), some of the hens (a mixture of Blues and Bantams), and a stash of hidden eggs I found. Covered with the florist's gauze, quilted in a grid and then some of the gauze cut away. Fun!

Here we have the Blue Andalusian rooster (Blue), some of the hens (a mixture of Blues and Bantams), and a stash of hidden eggs I found. Covered with the florist's gauze, quilted in a grid and then some of the gauze cut away. Fun!

Saturday, August 14, 2010
Third Set of Pieces for Exhibition

Here is another trio of Liquid amber leaves.

The first piece is a photo printed on to cotton, stitched veins and around the leaves, then I've added over the top some more leaves than have been made from florist's gauze that was painted and cut out to shape.


Friday, August 13, 2010
Second Pieces for Exhibition
I have a fascination for Liquid amber trees. The bark looks really old and gnarly and the leaves have such a recognisable shape. In autumn the colours are so varied and beautiful - from green with 'rust' spots of burgundy through yellow, red, burgundy and almost purple.
I have done 2 sets of 3 pieces.
This one I did in the late summer. I always have pressed leaves so was able to use them as a 'resist'. Using Pebeo setacolor transparent paint on white cotton, I painted a piece big enough to get a lovely range of leaf colours, arranged the pressed leaves over the paint and set it out in the sun to dry. I have tried doing this in the winter but the sunlight is not strong enough for the resists to work well.
Once dry and ironed to set the paint, each of the leaves was stitched outlining the veins. My quilting lines are the outlines of the leaves.
Here we are:
 you will see that in the center piece, one of the leaves is a little different - I used netting as the 'resist', stitched over it and trimmed away the excess.
I have done 2 sets of 3 pieces.
This one I did in the late summer. I always have pressed leaves so was able to use them as a 'resist'. Using Pebeo setacolor transparent paint on white cotton, I painted a piece big enough to get a lovely range of leaf colours, arranged the pressed leaves over the paint and set it out in the sun to dry. I have tried doing this in the winter but the sunlight is not strong enough for the resists to work well.
Once dry and ironed to set the paint, each of the leaves was stitched outlining the veins. My quilting lines are the outlines of the leaves.
Here we are:

Thursday, August 12, 2010
First Pieces for Exhibition
Here is the first selection of pieces.
 The very first piece I made was this:
 with the camera I zoomed into the camellia flower, then once downloaded I cropped the photo and enlarged. Printed it directly onto fabric and quilted it. The bullion stitches are the stamens. It's very much a safe and steady start!
 This piece is the same camellia flower but 'pulled back' from the extreme close-up from before. It has been printed on to T-shirt transfer and the gloss removed (you iron some baking paper over the print after it has cooled). Then it has been stitched with what is known as Thread Play (although I did do this as part of the quilting).
 The final piece, of this trio, is the camellia bud and leaves. I thought that the leaves looked just as beautiful as the flowers, as they have a definitive shape and great gloss. This has been printed on to fine silk fabric - the backing paper had almost as much ink as the fabric! Quilted and bound, and then the leaves were painted with acrylic gloss gel, to get that shiny look. I did test this on an off-cut piece to check that the ink from my inkjet printer didn't run or disappear.
The last piece I did just recently - that is to say I didn't do these 3 pieces one after the other. I had started getting more confident in working with different products by the time I figured out how to make the bud piece.
Each of these pieces I have managed to do something a little different. You will see that I have got more experimental as each idea has been processed.
Tomorrow: Liquidamber leaves.
Camellias


The last piece I did just recently - that is to say I didn't do these 3 pieces one after the other. I had started getting more confident in working with different products by the time I figured out how to make the bud piece.
Each of these pieces I have managed to do something a little different. You will see that I have got more experimental as each idea has been processed.
Tomorrow: Liquidamber leaves.
Wednesday, August 11, 2010
Drum Roll Please!
I've been busy working on a project for an upcoming exhibition. Six of us from the Collaborative Journal Project of 2008 are exhibiting at Taylor Jensen Gallery in Palmerston North from 21 August to 14 September 2010. So just over a month ago we got together to discuss what we should make.
Here we now have 2 challenges!
To create 30 pieces in a month, AND, to make them 6 inches x 12 inches.
Oh boy! I have to say that I was freaking out a little!
BUT, then I calmed down (I am a reactive redhead, after all!) and focused.
I really enjoy looking at things through the macro lens of the camera, so that gave me a Perspective.
Next I needed a Theme.
I decided on being Alice (in Wonderland), and looking at my garden from her 'little' (after she drank from the bottle) height.
Everything is related in some way to stitching. I wanted to try a different technique on each piece. After all I've read lots of books and wanted to try lots of different things relating to stitch, but really don't enjoy doing samples.
So here we have it!
Till tomorrow, then!
Here we now have 2 challenges!
To create 30 pieces in a month, AND, to make them 6 inches x 12 inches.
Oh boy! I have to say that I was freaking out a little!
BUT, then I calmed down (I am a reactive redhead, after all!) and focused.
I really enjoy looking at things through the macro lens of the camera, so that gave me a Perspective.
Next I needed a Theme.
I decided on being Alice (in Wonderland), and looking at my garden from her 'little' (after she drank from the bottle) height.
Everything is related in some way to stitching. I wanted to try a different technique on each piece. After all I've read lots of books and wanted to try lots of different things relating to stitch, but really don't enjoy doing samples.
So here we have it!
An exhibition
30 pieces
restricted size at 6" x 12"
We have called it:SIX Facets of a Rectangle (Stitch Innovative Xploration)
I will show you my pieces - mostly because you can't all visit the gallery! They are in sets of three, so are related in some way. I will explain what I have done on each piece and hope you will enjoy!Till tomorrow, then!
Subscribe to:
Posts (Atom)